JWAVE_DIR $  Read-only. Specifies the directory where JWAVE is installed. (Default:
 VNI_DIR/jwave-3_0)
JWAVE_SHUTDOWN  Specifies the shutdown procedure for the PV-WAVE session. You can use this procedure to do site-specific shutdown after every PV-WAVE session. (Default:
 JWAVE_SHUTDOWN)
JWAVE_STARTUP  Specifies the startup procedure for the PV-WAVE session. You can use this procedure to do site-specific initialization for every PV-WAVE session. (Default:
 JWAVE_START)
MANAGER_LOG $  Specifies the JWAVE Manager log file location, filename, and file continuation instructions. Leave this field blank (empty string) to discard logging. Use
 TERMINAL to have the logs go to the JWAVE Manager's terminal (stdout). Prefix the file with a "+" to append to the log when the manager is restarted (otherwise a new file will be created). (Default: TERMINAL)
MANAGER_START_HTTP  If set to
 TRUE, the command:
configures the JWAVE Manager to accept direct socket connections.
MAX_SESSIONS  Specifies the maximum number of simultaneous PV-WAVE sessions the JWAVE Manager will allow. Note that the session limit is also controlled by licensing, but this parameter may be useful for server performance tuning. (Default: 100)
PASSWORD  Specifies the server password for remote access to configuration information and JWAVE Manager shutdown. (Default: [
null])
PERSISTENT_SESSION_IDS  Specifies a list of PV-WAVE session ID numbers (positive numbers). The specified sessions do not time out as do regular sessions.
PING_ATTEMPTS  After a PV-WAVE session is started, the JWAVE Manager attempts to contact (ping) it. This property specifies the number of ping attempts that will be made before the session is considered dead (and an error exception is returned to the client). (Default: 5)
PING_INTERVAL  Specifies the delay (in milliseconds) between
 PING_ATTEMPTS. (Default: 500)
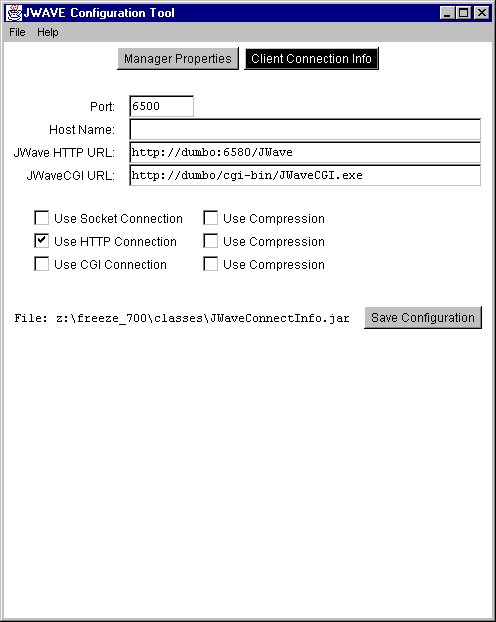
PORT $  Specifies the socket port number where the JWAVE Manager listens for client connections. Usually just a number, but may also be specified as hostname:port_number if you have multiple network addresses and want the JWAVE Manager to listen on only one. (Default: 6500)
SESSION_ERR_LOG  Specifies the log file location, filename, and file continuation instructions for ERROR output from individual PV-WAVE sessions. A "
#" character in the parameter will be replaced by a session ID number. If there is no "#", all sessions log to the same file. Leave this field blank (empty string) to discard logging. Use TERMINAL to have the logs go to the JWAVE Manager's terminal (stdout). (Default: $MANAGER_LOG)
SESSION_IDLE_CHECK_INTERVAL  Specifies how often (in minutes) to check for idle (unused) PV-WAVE sessions. (Default: 1)
SESSION_IDLE_TIMEOUT  Specifies how long (in minutes) idle (unused) PV-WAVE sessions will remain alive. After this time, idle sessions are closed. If a session is timed out, it is no longer available to its client. (Default: 5)
SESSION_OUT_LOG  Specifies the log file location, filename, and file continuation instructions for output from individual PV-WAVE sessions. A "
#" character in the parameter will be replaced by a session ID number. If there is no "#", all sessions log to the same file. Leave this field blank (empty string) to discard logging. Use TERMINAL to have the logs go to the JWAVE Manager's terminal (stdout). (Default: $MANAGER_LOG)
SESSION_POOL_SIZE  Sets the number of PV-WAVE sessions to pre-start. If there is a PV-WAVE session in the pool, a client's first contact becomes faster because it will not have to wait for the PV-WAVE process to start up. These are only used for auto-assigned sessions.
SESSION_START_TIMEOUT  Specifies the maximum time (in seconds) to wait for a PV-WAVE session to start. Sessions that take longer will be killed and an error exception will be returned to the client. You may wish to increase this value on slow or heavily loaded servers. (Default: 15)
SOCKET_BACKLOG  Specifies the maximum queue length (number of concurrent connections) for incoming connection requests (used by the ServerSocket class). If a connection request arrives when the queue is full, the connection is refused. (Default: 50)
SYSTEMROOT $  Windows NT only. Required for servers running on Windows NT. Set this property to your Windows NT directory. (Default:
 C:\Windows or the value of SYSTEMROOT at install time)
VERBOSE  Specifies logging level. Valid values are 0 (silent) to 3 (verbose). (Default: 2)
VNI_DIR $  Read-only. Required. The value is set by the
 manager[.bat] script.
WAVE_DIR $  Read-only. Specifies the directory where PV-WAVE is installed. (Default:
 $VNI_DIR/wave)
WRAPPER_PATH  Specifies directories that contain your custom JWAVE wrapper functions (
.cpr files). You can separate multiple directories on Windows NT with a ; (semi-colon) character, on UNIX with a : (colon) character. The standard PV-WAVE and JWAVE lib directories are automatically included. (Default: $JWAVE_DIR/lib/user)
 Installs PV-WAVE, which includes JWAVE components used for server-side development of JWAVE wrappers.
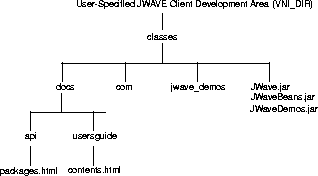
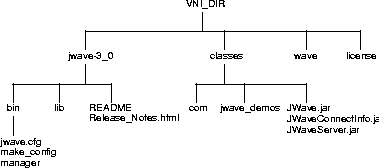
  Installs components used for client Java application development (JWAVE class library, reference documents, and JWAVE Beans). See Figure 8-1.
  Installs JWAVE server-side components required for deployment of JWAVE applications (JWAVE Manager, JWAVE Web Server, JWAVE Servlet, communication with JWAVE clients, and PV-WAVE). See Figure 8-2.
 Exit to exit the dialog box.
 arch
arch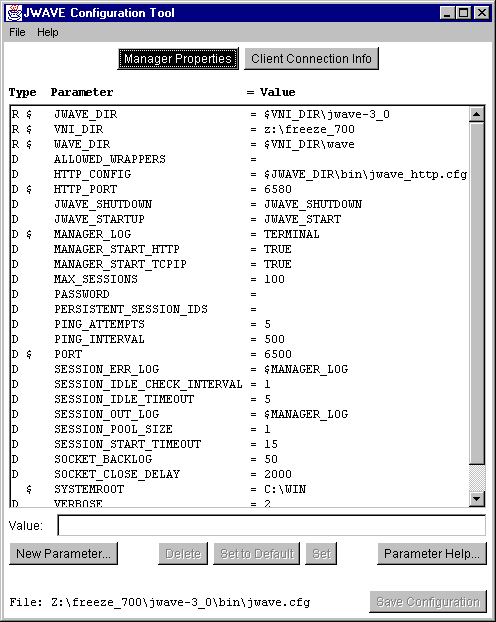
 1024 for JWAVE Manager to be contacted via CGI (the Web).