4.0 "How-to" NPIB-form tutorials
For NPIB1.6 modules a split web page appears with the NPIB1.6 form in the lower frame
and the upper frame appears with the "how-to-use" instructions. The lower frame
is created by a java form1.6 builder. This web page describes how to create the
NPIB1.6 form for the polar plot module02 as an example.
4.1.1 NPIB 1.6 forms accessed through a Web browser
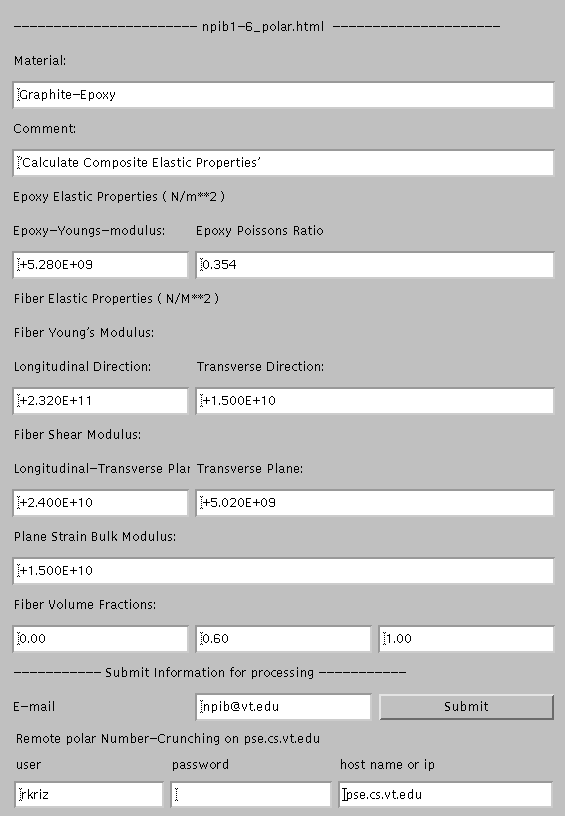
The NPIB1.6 form, shown below, appears in the lower frame on a Web browser where the
remote client can modify the numbers in this Web editable form and submit the job for
execution to a remote computer specified at the bottom of the form.
4.1.2. Setting up access to the form.jar "editor"
We provide a NPIB1.6 form editor ("form.jar") that creates new NPIB1.6 (*.html) files
or edits existing NPIB1.6 (*.html) files.
On the server spelunker.sv.vt.edu this NPIB1.6 form editor is located in one place:
In this case the /www/jwave/npib/form.jar is accessed by setting both the PATH
and CLASSPATH to this directory. With these two paths set any NPIB file (*.html)
can be edited in any directory when you logged onto the server (i.e. spelunker.sv.vt.edu).
Example of a shell script file named, form1.5:
Example of a shell script file named, form1.6:
These shell scripts can be placed in the user's ~/bin directory if the user defines
For this example on the server spelunker.sv.vt.edu we can go to the directory
/www/jwave/crcd/kriz/modules/module02 and edit the file npib1-6_polar.html with the
following command at the UNIX prompt.
spelunker% form1.6 -e npib1-6_polar.html
To create a new NPIB file at the UNIX prompt type...
spelunker% form1.6 -e
You can give this file a name using the Save option when you leave the editor.
4.1.3 Creating / Editing NPIB form files using the NPIB Creator "Working Window"
Only one "Working Window" should appear on your monitor**: (1) "NPIB Creator".
The earlier 1.5 version also generated a second window: "Output Editor".
IF you are logged onto the "NPIB-server" (i.e. spelunker) from a remote
workstation and are using NPIB1.6 form.jar file, then you must have setup the
environmental DISPLAY variable to display X-windows back to your remote
workstation**. If you are creating NPIB forms on a remote workstation we
recommend that you install your own NPIB1.6 form.jar file in the ~/bin directory
or create shell scripts in the ~/bin directory as described in the section on
ALTERNATE METHOD OF ACCESSING form.jar. !!NOTE!! If you are creating the NPIB1.6
file (*.html) on a remote machine it is not necessary to ftp transfer this file
to the "NPIB-server" (i.e. spelunker) because the newer NPIB1.6 form editor-creator
has a "Save Local" or "Save Ftp" feature built into NPIB1.6 form editor-creator
that transfers the edited NPIB1.6 form file to a directory on the "NPIB-server"
(i.e. spelunker). This will be explained by example below.
4.1.3.1 Information for working with the NPIB Creator "Working Window"
At the top of the NPIB Creator "Working Window" you can select from a number of
pulldown menu options.
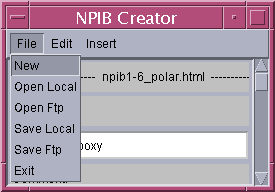
At the top of the NPIB Creator window under File, the choices are as
expected New, Open Local, Open Ftp,
Save Local, Save Ftp, and Exit.
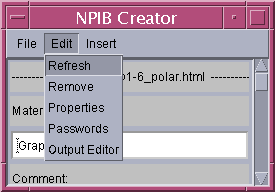
Under Edit the choices are Refresh, Remove,
Properties, Passwords, and Output Editor.
Properties, Passwords, and Output Editor
will be discussed later.
Refresh refreshes the working window, Remove removes the
last entry that was created from the items under Insert shown below.
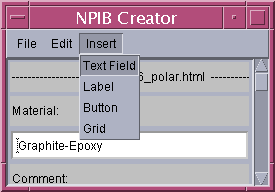
Under Insert the choices are
Text Field, Label, and Button,
and Grid.
The majority of the time you will select a Text Field box with a
Label above the box. Grid inserts an m-rows x n-columns
of Text Fields because such a grid is often needed and this saves time. A
Button is used to select or initiate a task.
When an item is selected under Insert an Insert-window appears
prompting you to enter a unique name for this item: Text-Field, Label, Button.
This name will be used again in the Output Editor "Working Window".
Next you will want to assign more information to your button, label or text-field.
When a text field, label, or button is selected with the left mouse button a
"Properties" window appears that requires you enter specific infomation for that item.
For example the figures below show Property windows for each of the items: Text
Field, Label, and Button.
Common to all these windows are endOfRow, foreground, background, and font. If
the item is the last in a row you must specify this by changing the endOfRow to
be True. Experiment with and change foreground, background, and font as needed.
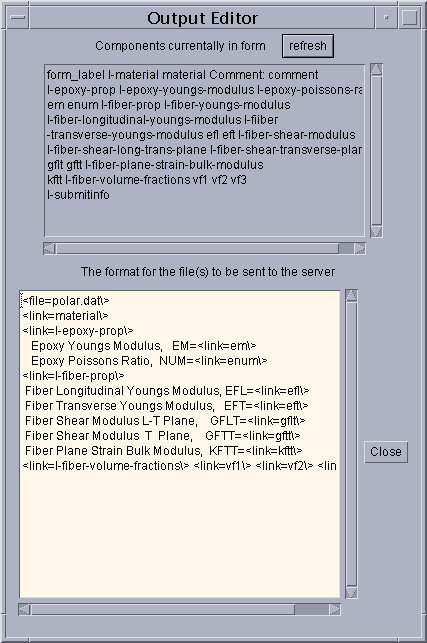
4.1.3.2. Information for working with the Edit - Output Editor "Working Window"
This "Working Window" describes how the data that is displayed in the NPIB form
will be formatted in the file submitted to the shell script.
For comparison the resulting file polar.dat shown below
corresponds to the syntax shown above.
TIME SAVING FEATURE:
At the top of the "Working Window" there is a window that lists "names"
associated with components: Text Fields, Labels, Buttons. These "names"
are listed in the window when "refresh" is selected. Double clicking on
any of these names transfers this entry into the format window below with
the correct syntax. This feature can save alot of time constructing the
syntax which is required by the data file to-be-read by the legacy code.
The final entry is the window where the data file format is set with links
to each of the textfield_names. The very first line in this window defines
the filename where data is stored and read by the legacy code. This data
file format (spacing, field length, etc.) is set according to the format
specified in the lines below. Here spaces are important if the program
reading this file as data input
requires accurate spacing which seperates the numbers associated with
textfield_name. Notice that all numbers associated with textfield_names use
the syntax, <link="textfield_name"\> . Recall that the textfield_names,
and their default numeric values, were assigned when the textfield_names
were first created. This is why the HELPFUL HINT recommended that you
keep a sketch of textfiled_names associated with the numbers in the boxes
on the NPIB form. You can always verify the textfield_name associated with
the texfield_item on the NPIB Creator "Working Window" but it is quicker
if you use a sketch.
Textfield name conditonal test syntax:
Example: Edit the npib.html file "form1-6_edge.html" in
../crcd/modules/module06 and find the line in the "Output Editor" format window.
Since the textfield_name noofbetalayers was assigned a value of 3
prior to the conditional test, then only BETA-values listed in the
first and second lines would be included in the data file
"npib_edge_prop_mech.dat". Because the Web form user can set the value
assigned to noofbetalayers prior to the conditional test, then the
Web form user determines which values of BETA are included in the data
file read by the legacy code.
This "Working Window" describes properties associates with the NPIB form.
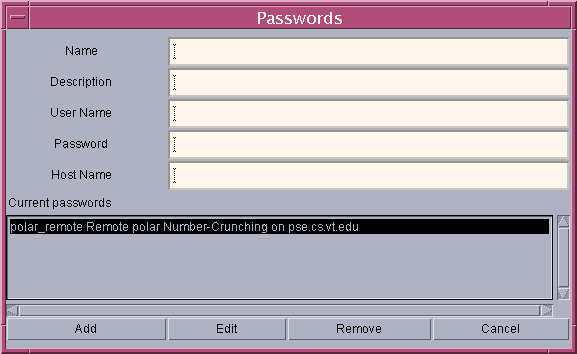
This "Working Window" describes information needed to submit a job to remote site
computers. The three images below show the progression of setting up this information.
Password information is stored in the lower area of the Passwords "Working Window".
Each line corresponds to providing information unique to each remote site computer.
Different password information can be set up for submitting multiple jobs to different
computers.
The first entry on each line is the password name, i.e. polar_remote. Double clicking
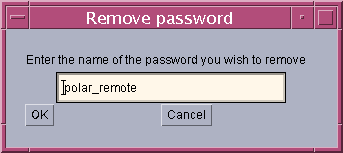
on this entry opens this name in a "Remove password" window which is shown below.
Selecting OK removes this line from the list below and places this information in the
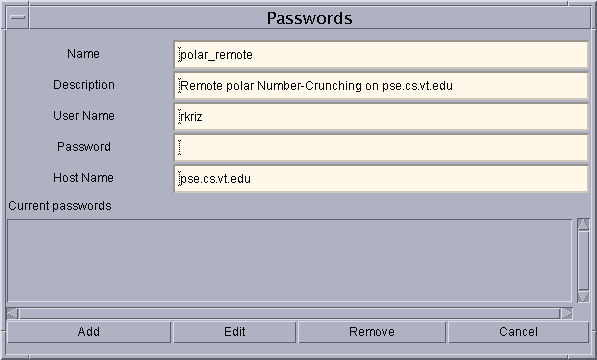
editable portion of the Passwords "Working Window".
When edits are complete select the "Add" button at the bottom to add this information
back to the line-list at the bottom of thw "Working Window". These entries should be
obvious except the "Description" entry appears in the NPIB form as text just above the
remote site: User Name, Password, and Host Name. We recommend to leave the Password
blank.
Save your results locally if you are logged onto the the Web server
1. Direct Editing NPIB1.6 Files Using a Text Editor: It is possible to directly
edit the syntax of the NPIB1.6 (*.html) file because it is a text file and the syntax
is simple enough to understand. We only recommend that in some instances this may
be an option to consider when the forms are particularly large where you may
want to copy and paste large blocks. In this case again the item_name is key
to finding the portion to edit.
4.1.4. "How-to" Create interface to files assocated with calculating
Polar Plots (module02)
4.1 How-To-Create NPIB1.6 forms: with interface to Polar Plot (module02)
The file form.jar is archived in the directory shown below along with java source code.
---------------------------------------------------------------------
ALTERNATE METHOD OF ACCESSING form.jar: is used when creating NPIB forms on remote
workstations or when using two different versions (1.5 or 1.6) of NPIB form.jar on the
"NPIB-server"
(i.e. spelunker). Either of these situations can be accommodated without defining PATH or
CLASSPATH
This can be done by creating a shell script for each version of form.jar.
#!/bin/sh
java -cp /usr/local/java2/lib:/www/jwave/applets98/form/form.jar:. form.FormLoader $*
!/bin/sh
java -cp /usr/local/java2/lib:$HOME/public_html/npib/form.jar:. form.FormLoader $*
their path to go to ~/bin (common practice). Of course depending on where the user
locates the different form.jar files requires changing the paths in these scripts.
-----------------------------------------------------------------------


After you have entered a unique name followed by OK, the item should appear just
after the last item entered in the NPIB Creator window. To move and reposition the
button, label, or text-field items, simply select the item to be moved by holding
down the left mouse button over the item on the NPIB Creator "Working Window" and
drag (hold down mouse button while moving the mouse) the item by moving the mouse
to the desired location. When you let go of the mouse button the item will appear
in the new location. NOTE: you will not see the item "move" but rather the item will
re-appear in the new position of the NPIB form near the location where the left mouse
button was released. You may have to reposition the selected item a second time and
"fine-tune" the the exact location. This is not intuative and takes some practice.
In this way all of the items (Text Field, Label, Button) of a working NPIB form can
be created and positioned as desired.
HELPFUL HINT: unless you have an excellent memory you may want to maintain
a hand written sketch on a seperate piece of paper as you build your NPIB
form where the "unique name" is written next to the item as you build the
form. You will need to access some of these "unique names" again when
building the file data format in the Output Editor "Working Window".
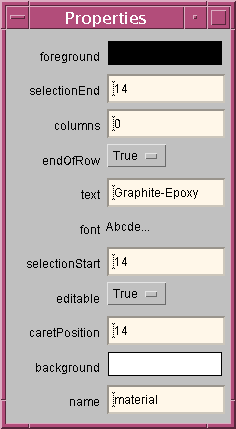
Text Field Property Window options not already mentioned: selectionEnd,
columns, text, selectionStart, editable, caretPosition, and name:
The Text Field properties window, shown at the left, is the tallest and has
the most options: sectionStart, selectionEnd define the beginning and end of the
text-field displayed in the text entry window. The possiblilities here are too
numerous to spell out in detail so the best way to learn about these options is
to experiment and see how each of them effect the NPIB form format.
The editable: True/False button at the bottom can be selected so that the
form user can not edit the displayed text if False is selected.
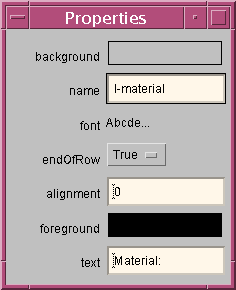
Label Property Window options,: alignment
Options for the labels are the same as for Text Field except for the
alignment option which left justifies the text if set to 0 and centers
the text if set to 1.
Only the Label Property Window initially sets the name and text equal.
Typically the Label_name and text have different entries. "Text" is what
the users sees on the final NPIB form and "name" is the unique Label_name
assigned at the time the item is created with Insert and is hidden except
if viewed in this property window.
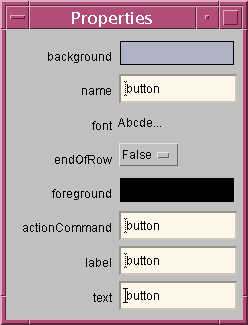
Button Property Window options: actionCommand
There is only one unique option for the Button Properties, that is the
actionCommand. In our case there is only one button which is the submit
button. The actionCommand only makes sense within the shell script. This
feature has only been used for the submit button.
GRAPHITE-EPOXY
EPOXY ELASTIC PROPERTIES ( N/M**2 )
   EPOXY YOUNGS MODULUS,   EM=+5.280E+09
   EPOXY POISSONS RATIO,  NUM=0.354
FIBER ELASTIC PROPERTIES ( N/M**2 )
 FIBER LONGITUDINAL YOUNGS MODULUS, EFL=+2.320E+11
 FIBER TRANSVERSE YOUNGS MODULUS,   EFT=+1.500e+10
 FIBER SHEAR MODULUS L-T PLANE,    GFLT=+2.400e+10
 FIBER SHEAR MODULUS  T  PLANE,    GFTT=+5.020E+09
 FIBER PLANE STRAIN BULK MODULUS,  KFTT=+1.500E+10
FIBER VOLUME FRACTIONS: 0.00 0.60 1.00
NOTE: after building many NPIB forms this portion is where
the most errors occur and hence the most time is spent. Getting the
format just right, is a task that is inherent to organizing data in
a file that is to be read by legacy code. Although we provided some
helpful time saving features in this editor, attention to detail is
an unavoidable task that must be realized in constructing this file.
A useful feature of the "Output Editor" format window is a conditional
test, that can be used to include or exclude numeric values associated
with textfield_names in the final data file: i.e. the following entry
<link=no_of_layers<2\> is a conditional test ("is the
no-of_layers less than 2 ?") that can be placed at the beginning
of lines defined in the "Output Editor" format window. If the conditional
test is true, then entries following this conditional test are included
in the data file, which will be read by the legacy code. This syntax
allows the NPIB Web form builder to enter more lines in the NPIB Web
form than needed by the Web form user. The Web form user can than
select which values are used to create the data file to be read by the
legacy code.
BETA values (beta1,beta2,beta3) defined for only one layer:
BETA1=<link=beta1\>  BETA2=<link=beta2\>  BETA3=<link=beta3\>
Note: this NPIB form requires that all layers of this composite
laminate use the same moisture expansion coefficients (BETAs). It is
possible to expand this form to include different moisture expansion
coefficients for each layer by including a conditional test on a
textfield_name set in the "Output Editor" format window. In the example
given below a conditional test on the textfield_name
noofbetalayers is added at the beginning of each line, where
noofbetalayers was assigned a numeric value in the same Web
form but prior to the conditional test.
BETA values (beta1,beta2,beta3) defined for up to three different layers:
<link=noofbetalayers>1\>BETA1-1=<link=beta1-1\>  BETA2-1=<link=beta2-1\>  BETA3-1=<link=beta3-1\>
<link=noofbetalayers>2\>BETA1-2=<link=beta1-2\>  BETA2-2=<link=beta2-2\>  BETA3-2=<link=beta3-2\>
<link=noofbetalayers>3\>BETA1-3=<link=beta1-3\>  BETA2-3=<link=beta2-3\>  BETA3-3=<link=beta3-3\>
NPIB Web form sequence:
Textfield_name: noofbetalayers = 3
Conditional test first line: noofbetalayers>1 TRUE, --- BETAs added to data file
Conditional test second line: noofbetalayers>2 TRUE, --- BETAs added to data file
Conditional test third line: noofbetalayers>3 FALSE, --- BETAs NOT added to data file
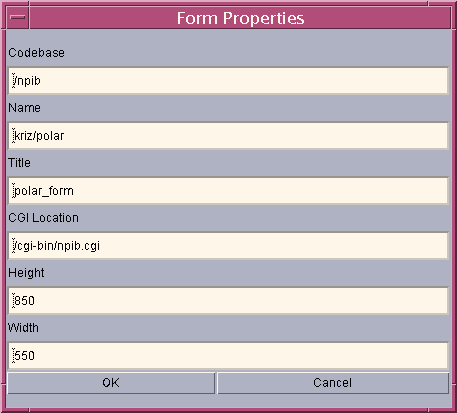
(i.e. /npib is equivalent to http://www.jave.vt.edu/npib)
<APP-directory-name> must be identical to
the directory-names used in the npib.commands file
which is described in section 3.1.3.
[or]
Save your results by FTP if you are creating the NPIB form on a remote workstation.
SUPPLEMENTARY NOTES:
**2. Remote Editing: If you are logged onto the server (i.e. spelunker.sv.vt.edu
from a remote workstation make sure you either use ssh or setup xhost "server-name"
and setenv DISPLAY "remote-workstation.IP.name:0.0" so that X-Windows are sent back to
your remote-workstation monitor. YOU MAY NEED TO REPOSITION THE WINDOWS USING ALT-F7
The NPIB form interface to the Polar Plot (module02) has be organized on the Web at
~rkriz/public_html/crcd/modules/module02
with sufficient documentation ("README" files and comments embedded in code)
in each directory so that the reader can study "how-to" setup similar modules.
Below we outline how to create a module and interface to the NPIB form.
---- This is the README file for ../module02/ARCHIVE/MOD_PVWAVE ----

This is a working archive directory where all results are confirmed
prior to making this into an interactive NPIB interactive module by
creating results in this directory. Instructions for creating results
are outlined below.

All programs in this directory work so that the viewer can download,
compile and run this programs on their computers.  This section is
divided into five sections:

1. Compile polar.f and create the executable polar.x

 - $FC $FFLAGS polar.f -o polar.x $LINK_FNL (If IMSL libs are used)
 - f77 polar.f -o polar.x (If subroutine inv(a,n,b) is used)

     NOTE: polar.x is spawned in the PV-WAVE procedure files

3) Plot results using existing PV-Wave procedure files

 - % wave create_e3
 - % wave create_g23
 - % wave create_nu32

4) View results in polar.html

5) Cleanup files in this directory

 - % remove_excess_files.sh

---------------------------------------------------------------------
     CREATION OF INTERACTIVE NPIB1.5 INTERFACE FOR THIS MODULE

Once verified, these working programs are copied to the NPIB directory
/www/jwave/applets98/Receiver/commands/polar_.d except for *.jpg,
*.byt *.out, *.DAT, *.sh such that the only remaining files in the
polar_.d directory are: *.pro, *.f, *.x, and polar.html.

DO NOT COPY README file from the MOD_PVWAVE directory to polar_.d.
DO NOT DELETED *.sh files FROM the MOD_PVWAVE directory.
The remove_excess_files.sh shell script file will remove the
appropriate files from MOD_PVWAVE for archiving.

A shell script file named "polar_" recreates results in a unique
directory located in http://www.jwave.vt.edu/output/"app_date-time"

  /www/jwave/applets98/Receiver/commands/polar_:
  -------------------------------------------------------------------
  #!/bin/csh
  cp /www/jwave/applets98/Receiver/commands/polar_.d/* $1
  cd $1
  source /usr/local/vni/CTT3.0/ctt/bin/cttsetup.csh
  source /usr/local/vni/wave/bin/wvsetup
  wave create_e3 > & e3_foobar
  wave create_g23 > & g23_foobar
  wave create_nu32 > & nu32_foobar
  rm e3_foobar g23_foobar nu32_foobar
  rm *.x
  rm *.byt
  rm *legend.jpg
  rm *.SAVE
  exit 0

  ----------------------------------------------------------------
     CREATION* OF INTERACTIVE NPIB1.6 INTERFACE FOR THIS MODULE

Is the same as creating NPIB1.5 interface except the "polar_" shell
script file is replaced with the npib-script file "polar.npib" and
both the polar_.d directory and polar.npib file are located within
the users public_html directory at ~USER_NAME/public_html/npib/polar/.
The polar.npib file uses ssh commands and unique "npib-commands" to
transfer files to the remote computer and coordinate execution at
remote and local(npib-server) computers. For NPIB1.6 the polar_.d
directory contains the same files except remote and local shell script
files are included in the NPIB1.6 polar_.d directory that are used to
execute program and procedures at remote and local computers. A more
complete description of the npib-commands is given in the NPIB1.6
Users-Guide.

   ~rkriz/public_html/npib/polar/polar.npib
   -----------------------------------------------------------
   lrun /export/home/rkriz/public_html/npib/polar/copypolar.sh
   sput $polar_remote
   srun $polar_remote ./remotepolar.sh
   sget $polar_remote
   lrun ./localpolar.sh

   shell script files in ~rkriz/public_html/npib/polar/polar_.d
   ------------------------------------------------------------
   #!/bin/csh
   #------------------ remotepolar.sh --------------------
   polar.x
   exit 0

   #!/bin/csh
   #-------------------- localpolar.sh  -------------------
   source /usr/local/vni/wave/bin/wvsetup
   wave create_e3 > & e3_foobar
   wave create_g23 > & g23_foobar
   wave create_nu32 > & nu32_foobar
   rm e3_foobar g23_foobar nu32_foobar
   rm *.x
   rm *.byt
   rm *legend.jpg
   exit 0

----------------------------------------------------------------------
* Motivation for creating NPIB1.6: With NPIB1.6 all files are located
  within the users home directory. NPIB1.5 required that the user copy
  and access files in a variety of different locations on the server.
---------------------------------------------------------------------
Ronald D. Kriz, Virginia Tech, 06-20-01
Contact: Dr. Ron Kriz
Created 6/24/01 | Revised 2/22/02
http://www.jwave.vt.edu/crcd/archives/npib1.6/usersguide/how-to-create1.6.html